A Roast Chicken Twofer

As much as I like to cook, I’m newer to roasted chickens than I would like to admit. Some of it I chalk it up to ignorance . . . I thought it’d take a long time, be a total pain in the butt, etc. But really, it’s pretty simple – more than a 30-minute meal, but it’s mostly hands-off prep. The other reason I roast chickens more often is that roasted chicken is one of L.’s all-time favorite meals. This is a girl who, when asked what she’d miss most after a trip to Madrid, cited “roasted chickens” as number two (ham was number one, and her baby cousin didn’t rank!?). As most of you know, my small friend eats almost NOTHING I blog about. Travesty. I don’t take it personally, ’cause really, the girl is missing out. But if I can make at least some things that knock the whole crowd’s socks off, well, I’ll work the crowd-pleaser, for sure.
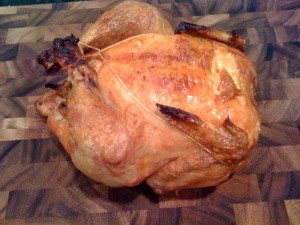
For us, “perfect” roasted chicken means a bird that’s moist on the inside, but which has a crispy, deeply browned and tasty skin. I think I’ve mentioned this before, but L. and I are chicken skin hounds. I grew up in a house where we had to divide up the skin from chicken, the fat from the top of a pork roast, etc. into perfectly equal little piles, one for each of us, or else we’d fight. And somehow I’ve been graced with a daughter with the same ideas of deliciousness. Luckily, D.’s not into it, so the split is two-way only.
This isn’t a recipe, so much as a method. Tweak it as you like, and save some skin for me!
Sarah’s Perfectly Simple Roast Chicken
one 3-5 lb. whole chicken (I really do think organic chickens taste better, so if you can spring for one, buy one) Kosher salt and freshly ground black pepper 4 medium-sized Yukon-Gold or other good baking potatoes (preferably organic, so you can eat the skin with no worries), scrubbed 2 large onions, peeled and cut into wedges Other veggies as desired (carrots, for example, can be great – we just happen to only eat onions and potatoes this way) 4 (or more!) cloves of garlic, smashed Extra-virgin olive oilDo you have a roasting pan with a rack? These are handy because they keep the chicken up off the floor of the pan and let the air circulate around the bird as it cooks. If you don’t, set your chicken on top of your potatoes and veggies in any sort of oven-proof casserole dish, or even in a large cast-iron skillet.
Preheat the oven to 450°.
If you’re using a roasting pan, coat the potatoes and onions in a little olive oil, salt & pepper them, and set them in the bottom of the pan – these’ll help keep your drippings from burning. Then put the roasting rack in the pan. If you’re using some alternative pan, coat the veggies and salt and pepper them and place them in the bottom of your pan.
Remove the innards from the chicken and rinse the chicken thoroughly. Pat it very dry, inside and out, with paper towels. Set it atop the roasting rack/veggies. Drizzle some olive oil on the chicken and massage it all over the bird. Generously salt the bird, and add pepper to taste. Insert the smashed garlic cloves into the cavity.
Roast for 30 minutes, breast-side-up; 30 minutes breast-side-down; and then approximately 30 minutes breast side up again (if you have a smaller chicken, you may want to shorten these times – my chickens tend to be toward the 5 lb. end). Check to make sure the juices are clear (or use a meat thermometer make sure it reads 160°). Remove the chicken to a cutting board and let rest for 5-10 minutes. Carve and enjoy! What about those veggies? Stir ‘em around in the schmalz (chicken fat) and serve them alongside the chicken. Feel free to drizzle the carved chicken with the pan juices too . . . .
Serves 4.

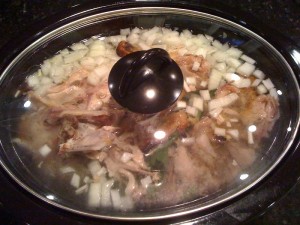
So . . . you have that carcass? What to do? How ’bout some EZ chicken stock in your Crockpot?? Another method for you.
Crock-Pot Stock
1 chicken carcass 3-4 carrots, peeled and roughly chopped 3-4 celery ribs, roughly chopped 1-2 onions, roughly chopped 3-4 cloves of garlic, smashed Big handful of parsely sprigs 1 bay leaf
Throw it all in the slow-cooker (6 qt. or bigger is better here), cover with water, and let cook on low overnight (12+ hours is fine!). In the a.m., strain out all the solids (I have a handy sieve that rests over the top of a mixing bowl – I pour the contents of the crock into that and voila! Homemade stock). Cover the bowl with the stock and set in the fridge to cool – skim off any fat and use within a few days, or else freeze your stock in small containers to use in the future. I have 1 cup Rubbermaid containers I use – the perfect amount to thaw for L. when she wants some noodle soup (which is almost daily in the cooler months) – make your pasta separately, throw in any leftover chicken bits, veggies, etc. and you’ve got warm hearty BPA-free soup! NB that there is no salt or pepper added here – I like to do this and then add them according to taste and other recipe ingredients.
© 2010 – 2011, Sarah. All rights reserved.


Pingback: Easy Peesy Roast Chicken With Apples & Leeks