Category — Baking
Sweet Holiday Hotlinks

Happy Wednesday, friends! Been a long time since I put up some hotlinks . . . . Here’s a nice collection of holiday links for you – focused on sweets. I haven’t tried them, yet, but if you do, will you post in the comments and let us know what you think?
Here’s a great-looking recipe for peppermint cookie bark. (Macheesmo)
This cookie made with pistachios, dried cranberries and candied ginger shouts “Christmas!” (Luna Cafe)
Perhaps you’ll want to loosen your belt and serve The Kitchen Witch’s rendition of Ina Garten’s luscious croissant bread pudding. (The Kitchen Witch)
Go free-form with this fabulous looking cherry almond galette- no hardcore baking skills needed. (The (Wicked) Awesome Whisk)
Here’s a collection of delicious-looking cookie recipes adapted from local bakeries. (Globe Magazine)
And last, but not least, a yummy sweet kugel recipe . . . if you’ve never had sweet noodle pudding, you need to try this one out . . . and you know? It’d be great (yet decidedly not traditional!) with your Christmas ham. (Bitten)
December 16, 2009 No Comments
Cookies!
Back on the butter train, folks . . . if you’d like to find vegan cookie recipes with whole wheat pastry flour or flax meal . . . please point your browser elsewhere today. ‘Cause for me, the real culinary spirit of Christmas is in a wide array of buttery, sugary treats. But what do I always say? Moderation in everything . . . so during this indulgent season, pick your battles. Don’t eat a sweet roll for breakfast, a heavy mayo-laden sammie for lunch and a rich prime-rib dinner, OK? If you’ve got a gathering in the evening, balance the apps, dinner and cookies with a light, fruit- and veggie-rich breakfast, a high fiber lunch that contains a bit of protein (think big green salad with some chicken, tofu or beans on top) and then have whatever you like later. Consider, however, having only what really looks super delicious and special to you – blindly grazing on all the options is a bigger deal fat- and calorie-wise. But here’s the thing – this is a once-a-year thing and you should ENJOY yourself, too . . . so if that means that if you really love indulging here and there, then I say, have at it. Life is waaay too short to deny yourself all that pleasure.
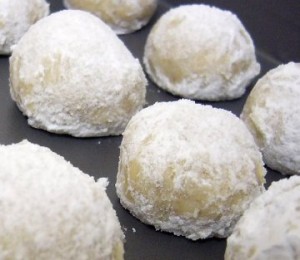
Today’s recipe evokes warm memories in me. My Grandma Helen’s walnut snowballs are a riff off Mexican Wedding Cakes, Russian/Swedish Tea Cakes, and a Lebanese cookie called mamoul. And while I’ve tweaked her recipe a bit over the years, no one can touch my Grandma in the cookie-baking department. Every Christmas, Grandma whipped up about 8 different kinds of cookies, placing them neatly in between sheets of waxed paper in Currier & Ives tins that she’d collected. Before guests came over, or after a meal, we’d haul out the various tins of goodies and pick and choose our favorites. Going to her house at Christmastime and eating all those different cookies is one of my top-ten childhood memories.
This recipe is my favorite of the lot. Rich and crumbly and not over-the-top sweet, with a great toasty walnut flavor. Best ever is that they also happen to be L.’s favorite Christmas cookie. So the traditions of my Swedish-American grandmother, who married my Lebanese-American grandfather, are living on through her Chinese-American great-granddaughter. Life is good.
Helen’s Walnut Snowballs
1 c. (2 sticks) salted butter, at room temperature 2 c. powdered sugar 2 t. vanilla extract 2 c. all purpose flour 1 c. walnuts, toasted and coarsely chopped
Beat the butter in a large bowl until light and fluffy. Add 1/2 c. powdered sugar and the vanilla; beat until well blended. Beat in the flour, then the walnuts. Divide dough in half; form each half into a ball. Wrap each ball separately in plastic wrap and chill until cold, about 30 minutes.
Preheat the oven to 350 degrees. Place the remaining 1 1/2 c. powdered sugar into a pie plate. Set aside.
Working with half of the chilled dough, roll the dough by 2 teaspoonfuls between palms into balls. Arrange the balls on a baking sheet lined with parchment, about 1/2-inch apart. Bake until golden brown on the bottom and just pale golden on the top, about 18 minutes. Cool cookies 5 minutes on the sheet. Gently toss each warm cookie in the powdered sugar to coat completely. Transfer the coated cookies to a wire rack to cool completely. Repeat the same procedure with the other half of the dough.
Makes about 4 dozen.
Here’s a little tip – did you know that most Christmas cookies can be baked and then frozen? It’s true! So if you’re a compulsive over-achiever planning type like me, you can start cranking out the goods weeks in advance, then layer them in air-tight containers (parchment or waxed paper in between layers, please) and pop ‘em in there for later. Cookies make welcome gifts and you’ll always have some on hand for company.
December 10, 2009 9 Comments
Chocolate Pecan Pie
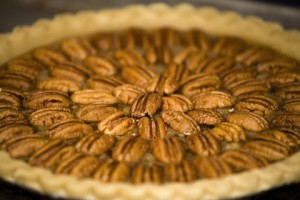
We’re rounding out the Thanksgiving dessert preparations today with pecan pie. Chocolate pecan pie, to be exact. This easy recipe isn’t for the faint of heart – it is RICH RICH RICH. Serve it with a little sweetened whipped cream and watch your guests hold their bellies with delight.
Chocolate Pecan Pie
1 single pie crust 4 oz. semisweet chocolate chips 4 large eggs, lightly beaten 1 ½ c. light corn syrup ½ c. sugar 1 t. vanilla extract ½ t. salt 1 c. pecans
Preheat your oven to 350 degrees and put your oven rack in the lowest position. Put the chocolate chips in microwave-safe bowl (preferably glass) and microwave in 15-20 second intervals to melt (be careful not to scorch those chips!!). Set aside.
In a medium bowl, stir together (don’t whisk) eggs, corn syrup, sugar, vanilla and salt. Stirring constantly, gradually add melted chocolate. Pour filling into prepared crust; place pie plate on a rimmed baking sheet. Arrange pecans in one even layer over the filling.
Bake just until set (filling will jiggle slightly when pie plate is tapped), 50-60 minutes, rotating halfway through cooking time. Let cook completely on a wire rack, at least 4 hours (or up to overnight) before serving.
Leftovers!?
OK, if you’re making all this pie, depending on how many guests you’re feeding, you’re gonna have leftovers. Which is never a bad thing, when it comes to pie – I mean, what better Friday-after-Thanksgiving-breakfast is there than a slice of pie and a cup of coffee or tea?? What’s the best way to store those goodies? Fruit pies (double or single-crust) are best stored at room temperature. Putting them in the fridge will only make the crust gummy. Wrap them well in foil and they should keep for 2 days. Custard and cream-filled pies (like pumpkin and pecan) should be wrapped in plastic wrap and put in the fridge. They’ll last for a day or two.
Stay tuned – learn all about Chia in Monday’s post! Have a great weekend.
November 6, 2009 2 Comments
Point of Clarification: “Blind Baking”

A mid-day post, how novel?! I wanted to get this up, stat, because I just got an email from a flummoxed reader who asked me to explain the term “blind baking” – the pumpkin pie recipe calls for you to blind bake the crust.
“Blind baking” is just a fancy term for baking the crust before you put the filling inside. You should use dried beans or pie weights (the pie weights I’ve seen are either ceramic balls or else little metal balls all linked together on a chain) to keep the bottom of the crust from puffing up too much as it bakes. It’s likely something you’ve already done, if you ever bake pie or quiche. For the uninitiated, after you get your crust situated in the pie plate, put a bunch of dried beans/pie weights in to cover the bottom part of the crust, bake for the time indicated, remove the beans/weights, and fill the pie.
Many recipes/cookbooks call for you to line the crust with aluminum foil before putting the pie weights in – this can help keep the crust from getting too brown. I don’t do this, and I haven’t had an issue with too much browning – in fact, I find the foil to be cumbersome and that it usually wrecks the crust a little bit going in. So if you wanna be a purist, you can do this, but I take the short-cut way and don’t.
Please, if you ever have questions about terms or recipes, just email me or post them in the comments, OK?
Carry on!
November 5, 2009 No Comments
Pumpkin Pie
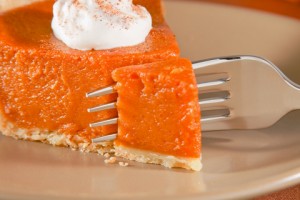
OK, back to pie today! The two other pies I make at Thanksgiving are pumpkin and pecan. Today we’ll deal with pumpkin. The pumpkin pie recipe is adapted from the America’s Test Kitchen Family Cookbook (a GREAT all-‘round cookbook if you’re looking for one – nice pictures, well laid-out, tasty, easy recipes). So, like all ATK recipes, it’s got some funky steps – but let me tell you, I was not a big fan of pumpkin pie ‘til I had this one. And my mother-in-law went crazy over it – I can’t remember if she says it’s the “best” she’s ever had, but this pie generates that level of enthusiasm. So it’s worth the effort.
For this pie, you’ll need one single pie crust – check out my post from the other day for the double crust recipe . . . just use one ball o’ dough and you’ll be all set!
Spiced Pumpkin Pie
1 (15-oz.) can pumpkin puree 1 c. packed dark brown sugar 2 t. ginger 2 t. cinnamon 1 t. nutmeg ¼ t. cloves ½ t. salt 2/3 c. heavy cream 2/3 c. whole milk (do not skimp and use skim!) 4 large eggs
Blind-bake the pie crust at 375 degrees, for about 20-30 minutes (crust will look dry and slightly golden). Remove the crust from the oven. If it’s not already there, set your oven rack to the lower-middle position and increase the oven temperature to 400 degrees. Note: the crust must be hot when the filling is added, so time this accordingly!
While the crust bakes, process the pumpkin, brown sugar, spices and salt in a food processor until combined, about 1 minute. Transfer the mixture to a saucepan and bring to a simmer over medium-high heat. Cook the mixture, stirring constantly, until thick and shiny, about 5 minutes. Whisk in the cream and milk, return to a simmer briefly, and then remove from the heat.
Put the eggs in the food processor (don’t bother cleaning the bowl beforehand) and process them until beaten and uniform in color. Keep the machine running and slowly add about half the hot pumpkin mixture through the feed tube. Stop the machine, add the remaining pumpkin, and continue to process the mixture until uniform, about 30 seconds longer.
Dip you finger in to taste – it is SO tasty! OK, enough.
Pour the warm filling into the hot, blind-baked crust. If you have extra filling, ladle it into the pie after it’s baked for about 5 minutes (your filling will settle a little bit in that time). Bake until the filling is puffy and lightly cracked around the edges, and the center of the pie wiggles like Jell-O, about 25 minutes. Transfer the pie to a wire rack and cool until warm or room temp. before serving.
You can make this pie ahead of time! Wrap it tightly in plastic wrap and refrigerate it for up to 2 days . . . .
November 5, 2009 1 Comment
Thanksgiving Countdown
Can you believe it’s November already? That Halloween is behind us and that we’re staring down the barrel of THE HOLIDAYS? The older I get, the more quickly time passes . . . not a great combo, if you think about it. But that’s for another post.
The next major food-oriented holiday is Thanksgiving – are you hosting? I *love* hosting Thanksgiving dinner, and have been doing it for our family for the past few years, but this year I asked for a pass since I’ve had all these foot issues . . . so my dear sister-in-law agreed to take on the job.
Over the next several days, I’ll share some of my favorite Turkey-day recipes with you – the ones I make, year after year. Even if you’re not hosting, chances are you’ve offered to “bring something” to contribute to the meal – come here for ideas, and let me know if you need a specific recipe. [Read more →]
November 3, 2009 5 Comments
Pumpkin Chocolate Chip Squares
I know I said that my favorite Halloween treats are pre-fab bits of artificial everything, but I have some favorite fall desserts that are more wholesome. And since I’ve been sharing lots of savory meal ideas, I thought I’d mix it up and share with you a super-easy fall dessert – loved by kids and grownups alike.
If you want to give this more nutritional value, you can substitute whole wheat pastry flour for all or half of the all-purpose flour called for in the recipe. The WW pastry flour has a higher starch and lower gluten content than regular WW flour, so it offers less structure for your product, but will give you a more tender result. Because it’s pastry flour, it’s finer and its somewhat nuttier taste is much less noticeable than regular whole wheat flour (read: less grit). I have made these with all WW pastry flour, and people have raved about them . . . shhhhh, they didn’t realize they were enjoying some added protein and fiber!
Pumpkin Chocolate Chip Squares
2 c. All-purpose flour 1 T. plus 1 t. Pumpkin pie spice 1 t. Baking soda 3/4 t. Salt 1 c. (2 sticks) Unsalted butter, softened 1 1/4 c. Sugar 1 Large egg 2 t. Vanilla 1 can Pumpkin puree (NOT pie filling – there should be no sugar added) 1 package (12 oz.) Semi-sweet chocolate chips
Preheat the oven to 350. Spray a 9×13-inch pan with cooking spray. In a medium bowl, whisk together the flour, pumpkin pie spice, baking soda and salt and set aside. With an electric mixer, cream together the butter and sugar until smooth and fluffy; beat in the egg and vanilla until combined. Beat in the pumpkin puree. Reduce speed to low and mix in the dry ingredients until just combined. Fold in the chocolate chips.
Spread the batter evenly in the prepared pan. Bake until the edges begin to pull away from the sides of the pan and a toothpick inserted in the center comes out with just a few moist crumbs attached, about 35-40 minutes. Cool completely in the pan, cut into squares, and serve!
Adapted from Martha Stewart Living Magazine
October 30, 2009 6 Comments
Cooking With Your Kid

Have you seen all those articles that say that if you get your kid(s) in the kitchen, they’ll be more invested in trying the foods they make? That they’ll suddenly become more adventurous and maybe even like to eat <gasp!> a wide variety of foods?
Well, in my case, it’s hogwash. My daughter has been cooking with me since she was 2-years-old, and since then, she probably eats fewer foods. This is a child that used to eat EVERYTHING with gusto. Then at 2, the list of foods she’d eat got progressively smaller and smaller. I used to scoff at picky kids and figure that it was nurture, but we are living proof that it’s not always the case. She was, for a period, on that dreaded American “beige diet” – it’s mortifying, I know. It’s interesting that all this time, she has clamored to be cooking with me, yet she has no interest in tasting the final product. I keep at it though. I’m stubborn.
But I digress.
There are some things she loves to make and eat. They’re all in the dessert category, surprisingly enough. Yesterday we made a great and easy s’mores bar cookie recipe. The Brownie troop leaders (of which I’m one – no snickering) and their kids got together to plan some meetings, and I offered to bring dessert. What’s more Girl Scouty than s’mores? This is a nice recipe for a 6-year-old because there are no electronics involved in the preparation, save for the oven. It’s just a smash, stir, dump, press, spread, sprinkle operation.
Enjoy!
Smore’s Cookie Bars
1 pouch Krusteaz sugar cookie mix1.5 c. graham cracker crumbs
1 c. unsalted butter, melted
3 c. semi-sweet chocolate chips
4 1/2 c. mini-marshmallows
Preheat oven to 375 degrees. Put several whole graham crackers (approximately 7) in a large zip-top bag and squeeze the air out. Pulverize the crackers with a rolling pin/meat mallet until they form a fine crumb. In a large bowl, stir together cookie mix and crumbs. Stir in melted butter until a soft, crumbly dough forms. Press into a 13×9-inch pan that’s been coated with cooking spray.
Bake 18 to 20 minutes or until set. Immediately sprinkle chocolate chips over crust. Let stand 3 to 5 minutes or until chocolate begins to melt. Spread chocolate evenly over crust.
Set oven to broil. Sprinkle the marshmallows over the melted chocolate. Broil 4 to 5 inches from heat for 20 to 30 seconds or until the marshmallows are toasted. (Watch closely; marshmallows will brown quickly.) Cool 10 minutes or longer.
Serve warm or room temp, and store any remaining bars tightly covered – those marshmallows will get hard & chewy if you don’t.
August 28, 2009 No Comments


