Category — Recipes
Lentils With Butternut Squash & Walnuts

More cooking inspired by my CSA loot – last night I used local butternut squash and cilantro, and man, this recipe is terrific! Sorta sweet from the squash, sorta zingy and a little spicy from the curry powder, nice toasty crunch thanks to the walnuts and nice, brite topnotes provided by the lime juice and cilantro. A party in your mouth . . . and your belly, because every darn thing in here is great for your body. This took about 40 minutes to prepare – that’s an outside estimate, which includes running into the living room twice to assist in the selection of an appropriate television show for L. Your cooking time may vary . . . .
Lentils With Butternut Squash & Walnuts
1 small butternut squash (or 1/2 of a squash – you need about 1 pound) 1 large shallot, minced 2 T. extra-virgin olive oil 1 1/2 t. curry powder 1/2 c. walnuts 1 1/2 c. low-sodium chicken broth 1/3 c. lentils (I used Pardina lentils, but brown are a good substitute) 2 T. chopped fresh cilantro sprigs Juice of 1/2 lime
Preheat the oven to 425 degrees. Halve, peel and seed squash and cut it into 1/2-inch pieces. In a 9×13-inch baking dish, toss the shallot with the squash, oil, curry powder, and salt and pepper to taste until combined well. Bake squash mixture in middle of oven until almost tender, about 20 minutes.
While the squash is baking, boil the chicken broth in a small saucepan, add the lentils, and cook until the lentils are just tender but not falling apart, about 20 minutes. Drain lentils in a sieve and transfer to a bowl.
Chop the walnuts and place them in a small, dry frying pan. Toast the walnuts over low-medium heat, stirring constantly.
To the lentils add the squash mixture, cilantro, lime juice, toasted walnuts and salt and pepper to taste and toss until combined well.
The original recipe says that this serves 2 as a side dish, but that’s a big portion of what I’d consider a very hearty side dish! I ate 1/2 of this recipe as my main course and was quite full . . . you could even serve this with brown rice or quinoa to stretch it out a bit if you like.
A note on toasting nuts: did you know that if you toast your nuts before adding them to recipes it’ll boost their flavor? All you need is a few extra minutes and a dry skillet. Toast the nuts over low heat, and stir them constantly. Watch them closely because they’ll toast all-of-a-sudden and can burn just as quickly!
November 12, 2009 4 Comments
Baked Apple Sauce and Braised Red Radishes
I’m straying from my promised Thanksgiving prep theme here – let me know if you want me to veer back . . . I’m just having so much fun with all these vegetables. When I started my gig as a stay-at-home mom (which as many of you know, I NEVER in a million years thought I would do), I found (still do) great pleasure and intellectual stimulation in seeking out new ways to cook different foods. This share’s brought back that old feelin’ again – yesterday’s challenge was what do I do with 10 lbs. of apples and I don’t love radishes, what to do?
L. loves applesauce. She also loves to cook – so the logical solution to the too many apples problem was applesauce (better for mama not to have a pie, or apple goodie around the house anyway). This easy recipe was our afternoon activity yesterday – peeling apples is a kid-friendly task, as is MASHING. Kids love to mash. Who can blame ‘em? (BTW, still have 8 apples left . . . hmmmmm).
Baked Apple Sauce
10 large apples, cored peeled and sliced 3/4 c. sugar 1 1/4 t. ground cinnamon 1 1/4 t. vanilla extract
Set aside 2 9×13-inch baking dishes. Place the apples in the dishes, dividing evenly between the two dishes. In a small bowl combine the sugar, cinnamon and vanilla; mix well. Sprinkle over apples. Cover each dish with foil and bake at 350 degrees for 40-45 minutes or until apples are tender. Uncover and mash with a fork or a potato masher. This stuff is SO delicious. Depending on your tastes and what sort of apples you use, you can play with the amount of sugar. This is sweet as is, but not sickeningly so. It’d be great on oatmeal, atop some fat-free Greek yogurt, mixed into wholegrain pancake batter (or on top of pancakes), as an accompaniment to latkes, etc. etc.
Next task was radish rescue. I’ve never been a fan of radishes – I mean, they’re OK, but I’d never buy some to nosh – only to make a salad look pretty or to use as garnish. I had a beautiful bunch of bright red radishes from the CSA share . . . so I consulted Deborah’s Madison’s Vegetarian Cooking For Everyone and made up this little ditty. Cooked radishes are much mellower than their raw cousins - I like them a lot better. The thyme in this went nicely with my leftover lentil soup.
Braised Red Radishes
1 bunch red radishes (approximately 10) 1 T. extra-virgin olive oil 1 shallot, minced Several pinches of dried thyme Kosher salt & freshly ground black pepper to taste Low-sodium chicken brothTrim the leaves from the radishes and scrub them clean. Leave small radishes whole and halve or quarter the larger ones – you are aiming for uniform size (and therefore cooking time) here. Heat the olive oil in a saute pan and add the shallot and the thyme and cook for 1 minute on medium heat. Add the radishes, a bit of salt and pepper and enough chicken broth to cover the radishes about halfway. Cover and simmer, stirring every 5 minutes or so, until the radishes are tender, about 20 minutes. Remove the radishes to a serving dish. Boil the remaining liquid (there won’t be much left) until only a little bit remains – it’ll be a lovely pinkish color and will be loaded with shallot and studded with the thyme. Pour this over the radishes, taste for salt and pepper and add more if you wish, and serve. Serves 2.
November 11, 2009 No Comments
CSA Love and Easy Garlicky Lentil Soup
Aw yeah, I love love love all this fresh produce! Sunday night we had an improptu pizza dinner at home, so I whipped up a quick tossed salad with what I had on hand – some of the delicious lettuce I got in my share on Saturday. I added some diced super sweet red peppers that were also included . . . and it was delicious. Even D. (a.k.a. “King Carnivore”) was raving about the tasty veggies.
So some of you have been wondering “what the heck is a CSA?” CSA stands for Community Supported Agriculture, and here’s how it works. The CSA I bought into is called the Shared Harvest CSA (formerly the Belmont CSA), which offers items from a few different farms in each share. So far, so great! I have one more distribution, next month, but I’m completely sold on them and will re-up for the spring/summer months if they go forward with that. I don’t have the space or growing conditions (too shady) to have a vegetable garden in the backyard, so this is the next best thing. Sure, I lack some control over what I get, but you know what? It’s an adventure, and I know I’ll be trying things I never have before (rutabaga, anyone?). Bring it on!
One of my goals for this fall and winter is to make more soup – it just hasn’t been something I’ve cooked often. Dunno why. Last night I made this Garlicky Lentil Soup using some of the garlic and onions I received in my share. It’s pretty quick to prepare – about 10 minutes to chop up the onions and garlic and throw it all in the pot, then approximately 25-30 minutes to cook. So you could come home from work, throw it together, then get lunches packed, answer emails, throw in laundry, etc. while it simmers. If you want to make it vegan, use vegetable broth instead of chicken. In either case, your house will smell yummy from all the garlic and thyme.
I served this up with a fresh green salad (I had more of my lettuce and peppers). It’d be super-delish with some crusty bread or toasty open-faced grilled cheese sandwiches on the side . . . .
Garlicky Lentil Soup
8 large cloves garlic, roughly chopped 1 medium onion, roughly chopped 1 T. extra-virgin olive oil 1 t. dried thyme leaves 2/3 c. Pardina lentils (these are Spanish lentils, and if you can’t find them, brown lentils are a good substitute – you want a lentil that’ll hold its shape) 4 c. low-sodium chicken broth 4 T. chopped fresh flat-leaf parsley leaves Kosher salt and freshly-ground black pepper to taste Extra-virgin olive oil to taste Red wine vinegar to taste
In a medium-sized saucepan, saute the onions and garlic in the 1 T. of olive oil until the onions are translucent. Add the lentils and the thyme, then pour in the chicken broth. Bring to a boil, then cover and simmer for 25 minutes, or until the lentils are tender. Stir in the parsley, salt and pepper to taste. Serve the soup drizzled with a little olive oil and red wine vinegar – the oil adds richness and the vinegar adds brightness. This recipe serves 2, but could easily be doubled. I ate one portion of this, and I imagine the leftovers will be spectacular today because the flavors will’ve had a chance to meld.
November 10, 2009 7 Comments
I’m Experimenting: Ch-Ch-Ch-Chia Seeds
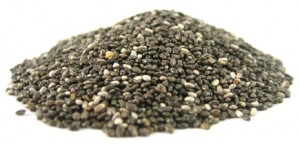
We’re going to start the week on a healthy note. Let’s take a little break from Thanksgiving prep to talk about a new adition to my diet, chia seeds. Have you heard of chia? You might remember Chia Pets, the cute little terracotta figurines you smear with seeds to help them grow “fur.” These are the same seeds, but don’t pilfer your pet’s stash – those seeds aren’t consumption grade. The ancient seeds are actually packed with rich nutrients. Chia seeds are a genus of the mint family, originating in Mexico’s central valley and were widely cultivated by Aztec cultures in pre-Hispanic times. Chia seeds were often used as currency for tax payments to nobility and as offerings for the Priesthood. They’re so nutritious that one tablespoon of seeds was believed to sustain an individual for 24 hours!
Chia is gluten-free, with very high concentrations of omega-3 fatty acids (ALA), significant levels of antioxidants, dietary fiber, oil, protein, calcium, phosphorous, and potassium. Two tablespoons of my Navitas Naturals chia powder have 70 calories, 4.5 grams of fat, 6 grams of fiber and 3 grams of protein.
So, why would a person choose chia over flax, another vegetarian source of omega-3′s? Chia actually has a slightly higher concentration of omega-3 fatty acids than flax. Another advantage of chia over flax is that chia is so rich in antioxidants that the seeds don’t deteriorate, so they can be stored for long periods without becoming rancid. And, unlike flax, chia doesn’t have to be ground to make its nutrients available to the body.
Another big reason to choose chia over flax is phytoestrogens. Are your eyes glazing over? Stick with me here! Those of you who’re living with breast cancer probably are already aware of phytoestrogens – they’re plant-based estrogens that may or may not mimic the natural estrogens in our body and therefore raise our estrogen levels. You can also find ‘em in soy, which is why a lot of women who’ve had breast cancer avoid or limit their soy consumption. Whether or not phytoestrogens raise your natural estrogen levels is still controversial, and I’ve heard differing opinions from reputable sources. So what’s the best alternative? Chia seed. Chia contains no phytoestrogens. And since it’s just as good, if not better source of ALA, why not use chia instead?
Another note – you can’t compare the omega-3 fatty acids in chia (or flax, for that matter) to the omega 3’s you get from salmon. It’s like comparing apples to oranges. The type of omega 3 in chia (and flax) is alpha-Linolenic acid, or ALA, which is different from the omega 3’s in fish – DHA and EPA – needed for optimal health. ALA must be converted in the body to DHA and EPA – so you need to eat seven times the amount of ALA to get 1 gram of DHA. That’s a helluva lot of chia. The bottom line here is that chia is a nutritious whole food and a good addition to a healthy diet. For a great all-around, but easy to understand primer on omega 3′s, take a look at this great post from Foodicate.
Whaddaya do with chia, anyway? Chia has a nutty, but unobtrusive flavor. You can mix the whole seeds in water and add lime or lemon juice and sugar to make a drink known in Mexico and Central America as “chia fresca.” As with ground flax, you can sprinkle ground or whole chia seeds on cereal, in yogurt or salads, or grind them and mix them with flour for making muffins or other baked goods. I’ve only tried them in smoothies, so far, and I will admit that I don’t foresee making baked goods with chia . . . I think that all the butter and sugar I use would negate any health benefit of the chia, frankly!
How ‘bout you? Have you tried chia? How do you incorporate these super-seeds into your diet?
November 9, 2009 No Comments
Veggie Abundance!

Happy Saturday, all. Today was beautiful ’round Boston - crisp, dry and brilliantly sunny. This afternoon, I picked up my first Shared Harvest CSA distribution and wowza! do I have some gorgeous looking stuff to prepare in the coming weeks.
Here’s what I got:
- Brussels sprouts
- Carrots
- Parsnips
- Sweet red peppers
- Radicchio
- White potatoes
- Sweet potatoes
- Yellow onions
- Garlic
- Baby bok choy
- Escarole
- Napa cabbage
- Spinach
- Cilantro
- Red radishes
- Red and green leaf lettuce
- Hakeuei turnips
- Butternut squash
- Leeks
- Rutabaga
- Kohlrabi
- 10 lbs. of assorted apples
- 1 lb. of black calypso beans
A ton of stuff. I’ve already mapped out some recipes for the coming week, including garlicky lentil soup, roasted lettuce, roasted radishes, curried Hakurei turnips, lentils with butternut squash and walnuts, pork tenderloin stir-fry with baby bok choy and clementines, and mmmm, a warm escarole salad with apples, candied walnuts and Saint Andre cheese. Can’t wait!
I’ll be posting recipes and providing commentary as I go along – there are a few things here I’ve never had . . . . Stay tuned!
November 7, 2009 4 Comments
Chocolate Pecan Pie
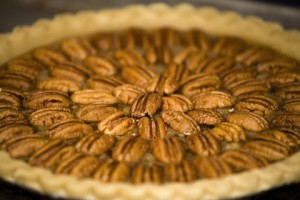
We’re rounding out the Thanksgiving dessert preparations today with pecan pie. Chocolate pecan pie, to be exact. This easy recipe isn’t for the faint of heart – it is RICH RICH RICH. Serve it with a little sweetened whipped cream and watch your guests hold their bellies with delight.
Chocolate Pecan Pie
1 single pie crust 4 oz. semisweet chocolate chips 4 large eggs, lightly beaten 1 ½ c. light corn syrup ½ c. sugar 1 t. vanilla extract ½ t. salt 1 c. pecans
Preheat your oven to 350 degrees and put your oven rack in the lowest position. Put the chocolate chips in microwave-safe bowl (preferably glass) and microwave in 15-20 second intervals to melt (be careful not to scorch those chips!!). Set aside.
In a medium bowl, stir together (don’t whisk) eggs, corn syrup, sugar, vanilla and salt. Stirring constantly, gradually add melted chocolate. Pour filling into prepared crust; place pie plate on a rimmed baking sheet. Arrange pecans in one even layer over the filling.
Bake just until set (filling will jiggle slightly when pie plate is tapped), 50-60 minutes, rotating halfway through cooking time. Let cook completely on a wire rack, at least 4 hours (or up to overnight) before serving.
Leftovers!?
OK, if you’re making all this pie, depending on how many guests you’re feeding, you’re gonna have leftovers. Which is never a bad thing, when it comes to pie – I mean, what better Friday-after-Thanksgiving-breakfast is there than a slice of pie and a cup of coffee or tea?? What’s the best way to store those goodies? Fruit pies (double or single-crust) are best stored at room temperature. Putting them in the fridge will only make the crust gummy. Wrap them well in foil and they should keep for 2 days. Custard and cream-filled pies (like pumpkin and pecan) should be wrapped in plastic wrap and put in the fridge. They’ll last for a day or two.
Stay tuned – learn all about Chia in Monday’s post! Have a great weekend.
November 6, 2009 2 Comments
Point of Clarification: “Blind Baking”

A mid-day post, how novel?! I wanted to get this up, stat, because I just got an email from a flummoxed reader who asked me to explain the term “blind baking” – the pumpkin pie recipe calls for you to blind bake the crust.
“Blind baking” is just a fancy term for baking the crust before you put the filling inside. You should use dried beans or pie weights (the pie weights I’ve seen are either ceramic balls or else little metal balls all linked together on a chain) to keep the bottom of the crust from puffing up too much as it bakes. It’s likely something you’ve already done, if you ever bake pie or quiche. For the uninitiated, after you get your crust situated in the pie plate, put a bunch of dried beans/pie weights in to cover the bottom part of the crust, bake for the time indicated, remove the beans/weights, and fill the pie.
Many recipes/cookbooks call for you to line the crust with aluminum foil before putting the pie weights in – this can help keep the crust from getting too brown. I don’t do this, and I haven’t had an issue with too much browning – in fact, I find the foil to be cumbersome and that it usually wrecks the crust a little bit going in. So if you wanna be a purist, you can do this, but I take the short-cut way and don’t.
Please, if you ever have questions about terms or recipes, just email me or post them in the comments, OK?
Carry on!
November 5, 2009 No Comments
Pumpkin Pie
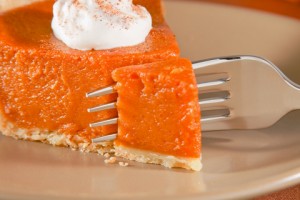
OK, back to pie today! The two other pies I make at Thanksgiving are pumpkin and pecan. Today we’ll deal with pumpkin. The pumpkin pie recipe is adapted from the America’s Test Kitchen Family Cookbook (a GREAT all-‘round cookbook if you’re looking for one – nice pictures, well laid-out, tasty, easy recipes). So, like all ATK recipes, it’s got some funky steps – but let me tell you, I was not a big fan of pumpkin pie ‘til I had this one. And my mother-in-law went crazy over it – I can’t remember if she says it’s the “best” she’s ever had, but this pie generates that level of enthusiasm. So it’s worth the effort.
For this pie, you’ll need one single pie crust – check out my post from the other day for the double crust recipe . . . just use one ball o’ dough and you’ll be all set!
Spiced Pumpkin Pie
1 (15-oz.) can pumpkin puree 1 c. packed dark brown sugar 2 t. ginger 2 t. cinnamon 1 t. nutmeg ¼ t. cloves ½ t. salt 2/3 c. heavy cream 2/3 c. whole milk (do not skimp and use skim!) 4 large eggs
Blind-bake the pie crust at 375 degrees, for about 20-30 minutes (crust will look dry and slightly golden). Remove the crust from the oven. If it’s not already there, set your oven rack to the lower-middle position and increase the oven temperature to 400 degrees. Note: the crust must be hot when the filling is added, so time this accordingly!
While the crust bakes, process the pumpkin, brown sugar, spices and salt in a food processor until combined, about 1 minute. Transfer the mixture to a saucepan and bring to a simmer over medium-high heat. Cook the mixture, stirring constantly, until thick and shiny, about 5 minutes. Whisk in the cream and milk, return to a simmer briefly, and then remove from the heat.
Put the eggs in the food processor (don’t bother cleaning the bowl beforehand) and process them until beaten and uniform in color. Keep the machine running and slowly add about half the hot pumpkin mixture through the feed tube. Stop the machine, add the remaining pumpkin, and continue to process the mixture until uniform, about 30 seconds longer.
Dip you finger in to taste – it is SO tasty! OK, enough.
Pour the warm filling into the hot, blind-baked crust. If you have extra filling, ladle it into the pie after it’s baked for about 5 minutes (your filling will settle a little bit in that time). Bake until the filling is puffy and lightly cracked around the edges, and the center of the pie wiggles like Jell-O, about 25 minutes. Transfer the pie to a wire rack and cool until warm or room temp. before serving.
You can make this pie ahead of time! Wrap it tightly in plastic wrap and refrigerate it for up to 2 days . . . .
November 5, 2009 1 Comment


